
Being able to manage a server remotely is a great thing to strive for, as it allows you to check in or troubleshoot things from anywhere in case something goes wrong.
Even though it certainly is possible to schedule and manage maintenance tasks (such as automated backups) using Linux's native crontab package and a remote SSH connection, I find it preferable to manage such tasks using a task scheduler with a UI such as Cronicle, an awesome open source project which even describes itself as "a fancy Cron replacement".
In this guide, I'll show how to install Cronicle using Docker Compose and set up automated job runs.
Prerequisites
A server running some flavor of Linux and Docker/Docker Compose. That's it!
Installation and Setup
Installing Cronicle using Docker Compose is simple.
Here's a minimum viable snippet to include in your docker-compose.yml that will get Cronicle up and running.
services:
  cronicle:
    container_name: cronicle
    image: bluet/cronicle-docker:latest
    hostname: cronicle
    network_mode: host
    volumes:
      - /var/run/docker.sock:/var/run/docker.sock
      - /etc/docker/cronicle/data:/opt/cronicle/data
      - /etc/docker/cronicle/logs:/opt/cronicle/logs
      - /etc/docker/cronicle/plugins:/opt/cronicle/plugins
      - /etc/docker/cronicle/app:/app
    restart: unless-stopped
Note that I have network_mode: host set here instead of opening up any specific ports for accessing this service. There are a few reasons for this that I'll cover in a bit.
At this point, it's a good idea to access the service locally, log in (the default username and password is admin), and change the password to something more secure by clicking the grey avatar in the top-right corner and filling the form.
Setting up External Access with a TLD
For now, this will get Cronicle up and running, and it will be served on port 3012. If you're using a Cloudflared Tunnel to expose your server to the public internet, you can check out the guide on how to access this service using your qualified domain name.
Once you've got that configured, add your domain name to your .env file and change the cronicle snippet in your docker-compose.yml file to set the environmental variable CRONICLE_base_app_url.
services:
  cronicle:
    container_name: cronicle
    image: bluet/cronicle-docker:latest
    hostname: cronicle
    network_mode: host
    environment:
      - CRONICLE_base_app_url=https://cronicle.${BASE_URL}
    volumes:
      - /var/run/docker.sock:/var/run/docker.sock
      - /etc/docker/cronicle/data:/opt/cronicle/data
      - /etc/docker/cronicle/logs:/opt/cronicle/logs
      - /etc/docker/cronicle/plugins:/opt/cronicle/plugins
      - /etc/docker/cronicle/app:/app
    restart: unless-stopped
I set the BASE_URL environmental variable in my .env file
Note that you'll need to restart your service container for this to take effect:
eric@ubuntu-server:~$ docker compose down cronicle && docker compose up cronicle -dThis will be used to qualify any links that are generated within Cronicle so that logs and other services function correctly even when using this service outside of its native network.
Setting up Email
It is recommended to get access to an SMTP server and set that up within Cronicle so that you can be automatically notified if a job fails (or if it succeeds, if you'd like).
The method for getting access to your email provider's SMTP server will vary depending on your email provider, so check in their settings and documentation for how to do it. Here's the information that you are looking for:
- Server URL
- This is probably something like
smtp.email-provider.combut will vary by provider
- This is probably something like
- SMTP Port
- 2-4 digit port number set by the provider
- Username
- This will almost always just be your email address that you registered and use with your provider. Note that this may or may not require the domain (
@email-provider.com) portion of your address. If you run into authentication related errors, try including/excluding this.
- This will almost always just be your email address that you registered and use with your provider. Note that this may or may not require the domain (
- Password
- The password credential associated with the above username. This will probably be your normal password but occasionally email providers will provide new passwords to users for app-based SMTP access.
Once you have these, add them to your .env file and add the corresponding values to docker-compose.yml under the respective environmental variables:
services:
  cronicle:
    container_name: cronicle
    image: bluet/cronicle-docker:latest
    hostname: cronicle
    network_mode: host
    environment:
      - CRONICLE_base_app_url=https://cronicle.${BASE_URL}
      - CRONICLE_smtp_hostname=${SMTP_URL}
      - CRONICLE_smtp_port=${SMTP_PORT}
      - CRONICLE_email_from=${SMTP_EMAIL_FROM}
      - CRONICLE_mail_options__auth__user=${SMTP_AUTH_USER}
      - CRONICLE_mail_options__auth__pass=${SMTP_AUTH_PASS}
    volumes:
      - /var/run/docker.sock:/var/run/docker.sock
      - /etc/docker/cronicle/data:/opt/cronicle/data
      - /etc/docker/cronicle/logs:/opt/cronicle/logs
      - /etc/docker/cronicle/plugins:/opt/cronicle/plugins
      - /etc/docker/cronicle/app:/app
    restart: unless-stopped
I set the SMTP_PORT, SMTP_PORT, SMTP_AUTH_USER, SMTP_EMAIL_FROM, and SMTP_AUTH_PASS environmental variables in my env file. Note that in most cases SMTP_EMAIL_FROM will be the same as SMTP_AUTH_USER.
You'll need to restart your service container for this to take effect:
eric@ubuntu-server:~$ docker compose down cronicle && docker compose up cronicle -d✔️ Access to the email provider's SMTP server is one of the reasons that the Cronicle container was set up using network: hostThe basic setup and configuration is now complete! Let's move on to running a simple task.
Setting Up Jobs
Now that we've got the service up and running and the SMTP info set up, let's set up a quick job to test if it's working.
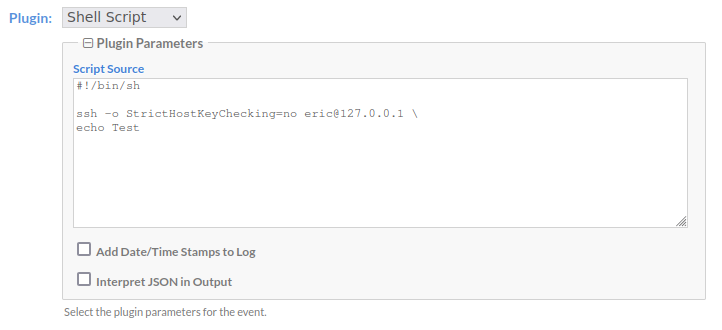
- From the console, click Scheduler > Add New Event.
- There are a lot of items here, but most can be left at their default values. Let's just set the strictly necessary ones to start:
- Event Name - whatever you'd like
- Category - set as General for now
- Plugin - choose Shell Script for this test
- Enter something simple as your Shell Script (under Plugin Parameters):
echo Test
- Enter something simple as your Shell Script (under Plugin Parameters):
- Timing - choose On Demand for this test
- Notification - Enter your email in Email on Success and Email on Failure. If you set up your email in the admin user page earlier when changing the password, you scan just click the Add Me button here.
- Click Create Event
The newly created event should show up now in the next screen:

- Click Run and follow the job to completion:

If it runs, successfully, that's great! You should also have received an email notification of its completion:

If your jobs are running successfully but you aren't receiving the notifications as expected, click the Admin tab in the console and see if there's anything in the logs regarding a failed email push. If something is showing up here, it's likely that your provided SMTP information is not correct. If there's nothing here, go back and double-check to make sure that you correctly enabled email notifications for the test job.
Running a Job on the Host System
There's one huge drawback to setting up the system using Docker: jobs ran by Cronicle are going to run in the shell of the Docker container, not the host's native shell. This makes it difficult to run maintenance tasks on the rest of the system outside of the container (i.e. if you need to clean up some files from some other container in the /etc/docker/ directory.
Luckily, there are a couple different solutions to this.
Option #1: Mount any necessary volumes/directories in the Cronicle container
This option will work if you simply need to interact with one or more directories on the host system, such as if you need to clean up a file or directory structure on an automated basis.
To do this, simply add the host's volume under the volumes portion of the cronicle service in the docker-compose.yml file:
services:
  cronicle:
    container_name: cronicle
    image: bluet/cronicle-docker:latest
    hostname: cronicle
    network_mode: host
    environment:
      - CRONICLE_base_app_url=https://cronicle.${BASE_URL}
      - CRONICLE_smtp_hostname=${SMTP_URL}
      - CRONICLE_smtp_port=${SMTP_PORT}
      - CRONICLE_email_from=${SMTP_EMAIL_FROM}
      - CRONICLE_mail_options__auth__user=${SMTP_AUTH_USER}
      - CRONICLE_mail_options__auth__pass=${SMTP_AUTH_PASS}
    volumes:
      - /var/run/docker.sock:/var/run/docker.sock
      - /etc/docker/cronicle/data:/opt/cronicle/data
      - /etc/docker/cronicle/logs:/opt/cronicle/logs
      - /etc/docker/cronicle/plugins:/opt/cronicle/plugins
      - /etc/docker/cronicle/app:/app

      # Other Volumes
      - /etc/docker/my-other-container:/host/my-other-container
    restart: unless-stopped
In this case, you could simply run a Shell script that interacts with the directory /host/my-other-container. Simple!
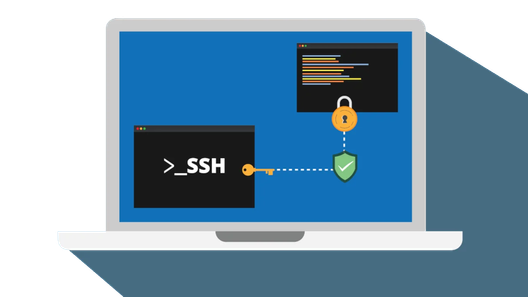
Option 2: Running a command from the host shell using SSH
This option requires a little bit of setup, but provides more flexibility in case you need to run something from the host's shell, such as if you needed to run a separate Docker command.
Step 1: Mount a volume for the SSH keys in the container
Add a directory in /etc/docker/cronicle for the SSH keys that we'll generate for Cronicle. This way, the key will be saved across sessions if the container is ever taken down.
services:
  cronicle:
    container_name: cronicle
    image: bluet/cronicle-docker:latest
    hostname: cronicle
    network_mode: host
    environment:
      - CRONICLE_base_app_url=https://cronicle.${BASE_URL}
      - CRONICLE_smtp_hostname=${SMTP_URL}
      - CRONICLE_smtp_port=${SMTP_PORT}
      - CRONICLE_email_from=${SMTP_EMAIL_FROM}
      - CRONICLE_mail_options__auth__user=${SMTP_AUTH_USER}
      - CRONICLE_mail_options__auth__pass=${SMTP_AUTH_PASS}
    volumes:
      - /var/run/docker.sock:/var/run/docker.sock
      - /etc/docker/cronicle/data:/opt/cronicle/data
      - /etc/docker/cronicle/logs:/opt/cronicle/logs
      - /etc/docker/cronicle/plugins:/opt/cronicle/plugins
      - /etc/docker/cronicle/app:/app

      # SSH
      - /etc/docker/cronicle/ssh:/root/.ssh

    restart: unless-stopped
As always, take down and re-up the container for effects to take place.
Step 2: Create SSH keys in the Cronicle container
Run the following from the host shell:
eric@ubuntu-server:~$ docker compose exec -it cronicle ssh-keygenSelect the default option for the location of the key file and the passphrase (the default passphrase is NO PASSPHRASE: this is important).
You should see some output like this:
Generating public/private rsa key pair.
Enter file in which to save the key (/root/.ssh/id_rsa):
Enter passphrase (empty for no passphrase):
Enter same passphrase again:
Your identification has been saved in /root/.ssh/id_rsa
Your public key has been saved in /root/.ssh/id_rsa.pub
The key fingerprint is:
SHA256:rLtz1wDrAnl83b6fZ+GTHFrSqIdrfjfeJsCbdbBATOM root@cronicle
The key's randomart image is:
+---[RSA 3072]----+
|           oo    |
|           .o.   |
|           .E    |
|       ..   . .  |
|     o  S+ o .oo |
|    o o.o o +oo=.|
|     o.o   +o=*.+|
|      o.o .+=+.O=|
|      o= .oo=o=*+|
+----[SHA256]-----+
Step 3: Add the key to the authorized keys on the host
Now, we just need to make sure that the Cronicle Docker container is authorized to SSH into the host.
Do this by running the following:
eric@ubuntu-server:~$ cat /etc/docker/cronicle/ssh/id_rsa.pub >> ~/.ssh/authorized_keysStep 4: Verify the host by SSHing from the container's shell
Before being able to run commands from the Cronicle dashboard, we need to SSH one from the container's shell to our host.
To do this, first access the container's shell from the host shell:
eric@ubuntu-server:~$ docker exec -it cronicle bash
cronicle:/opt/cronicle#
Then, SSH back to your host (replacing eric with your username) and respond to the prompt with yes
cronicle:/opt/cronicle# ssh [email protected]
The authenticity of host '127.0.0.1 (127.0.0.1)' can't be established.
ED25519 key fingerprint is SHA256:VltpoyrDgKxD9SqTESk2JoxapckA6pnmCQdH+nbdcqU.
This key is not known by any other names.
Are you sure you want to continue connecting (yes/no/[fingerprint])? yes
Warning: Permanently added '127.0.0.1' (ED25519) to the list of known hosts.
Welcome to Ubuntu 22.04.5 LTS (GNU/Linux 5.15.0-119-generic x86_64)

 * Documentation:  https://help.ubuntu.com
 * Management:     https://landscape.canonical.com
 * Support:        https://ubuntu.com/pro
New release '24.04.1 LTS' available.
Run 'do-release-upgrade' to upgrade to it.

Last login: Wed Oct  9 21:13:31 2024 from 127.0.0.1
That's it. Now we're ready to run a job using the Cronicle dashboard.
Step 5: Set up a job to run on the host shell using SSH
Setting up a job to run on the host shell over SSH is almost the exact same as setting a job up normally.
Simply go through the steps outlined above, but when entering in the Shell script, add the prefix to SSH into your host shell and run the command from there:
ssh -o StrictHostKeyChecking=no [email protected] \
some-command.sh
Again, replace eric with your host username
Then, run and test your job to make sure it runs smoothly. That's it!
✔️ Access to the host over 127.0.0.1 is the other reason that the Cronicle container was set up using network: host. ⚠️ There are other ways to go about this, however, if you strictly do not want to usenetwork: host: replace references to127.0.0.1withhost.docker.internal. But, note that you may deal with some headaches getting the container and the host to talk to each other over port 22 (ssh)
Scheduling a Job
Scheduling a job using Cronicle is easy.
At a Specific Time
To set up a job to run at a specific time, go to that job's details page and find the section Timing.
From here, change the value from On Demand to whatever frequency at which you'd like the job to run. From there, simply configure the timing based on Cronicle's great UI and click Save Changes.
For example, my job here runs daily at 3:00 AM:

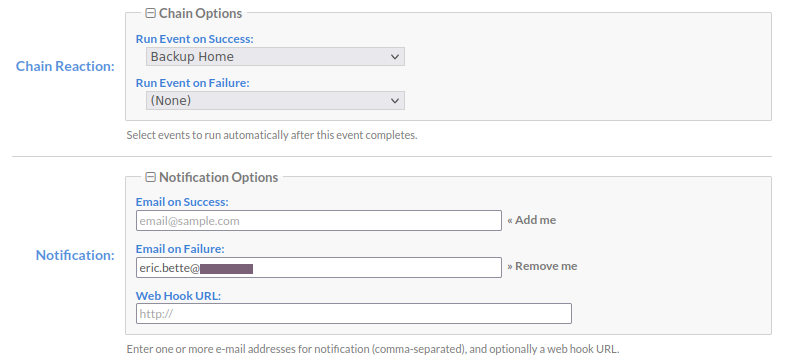
When Another Job Completes
Jobs can also be configured to run on in a chain.
To do this, we'll configure the upstream jobs to trigger the downstream jobs when they complete (as opposed to scheduling a job to run when another job completes).
To do this, go to that job's details page and find the section Chain Reaction. Configure the job that you'd like to run when the job completes successfully (Run Event on Success) and/or when the job fails (Run Event on Failure).
This is handy if you'd like to continue the chain on Success but do some cleanup or other task on Failure, or if you'd like to continue the chain regardless of the success of the previous job.
My job here kicks off a downstream job to backup a different directory when it completes successfully, and separately notifies me if it fails:
Conclusion and Next Steps
In this guide, I showed how to install and set up Cronicle as a task scheduler on a server using Docker Compose, as well as how to set up email notification services within Cronicle using your email provider's SMTP configuration.
I went on to show how to set up simple shell scripts as scheduled tasks and, importantly, how to run shell tasks from your server's host shell instead of Cronicle's container shell.
Finally, I showed how to orchestrate your jobs using Cronicle's scheduling a functionality as well as how to set up a simple pipeline using Cronicle's chain reaction feature.
As next steps, I'd recommend continuing to set up Cronicle by organizing your jobs within Categories and creating sensible pipelines. As a tenant, I generally make sure that each job only does one thing, such as running a script or running some other command. If I have a task that requires more than one command, I recommend consolidating those commands into a script on the shell host or in the /etc/docker/cronicle directory, or set up separate jobs using the chain reaction functionality described above.
In future articles, I'll show more specific implementations of maintenance tasks that I run using Cronicle, such as automated backups of core directories, and web scrapes of my personal and financial data.
As always, thanks for reading and feel free to leave thoughts and questions below!