
A Cloudflared Tunnel is a great option to reverse proxy traffic to a home server. Not only is it free and production-ready, it is also very easy to set up and configure. On top of this, it is the easiest option for setting up a publicly available website over a CGNAT, so if you've got an ISP that won't give you a dedicated IP, a Cloudflared Tunnel is a great solution for getting your machine online.
Setting up a Cloudflared Tunnel using Docker Compose allows us to run the CLI/tunnel in a containerized environment in the background with minimal operational overhead.
Setup
Set up is pretty straightforward, with some quirks due to the fact that we're running this containerized.
One note is that I'm opting to configure this tunnel through the Cloudflare Zero Trust Dashboard (as opposed to locally through the CLI). I have tried both and found that the dashboard is quite responsive and easy to work with.
Prerequisites
This article is assuming you already have Docker/Compose installed on your machine.
Initial Tunnel Creation
Go through the steps outlined through the Cloudflared documentation here, all the way up to (but not including) Step 1.6 (installing and connecting your tunnel to your machine).
When arriving at this point, you should:
- Have a website set up and configured on the Cloudflare name servers
- Have a tunnel created on the Cloudflare Zero Trust service, but not yet connected to your server
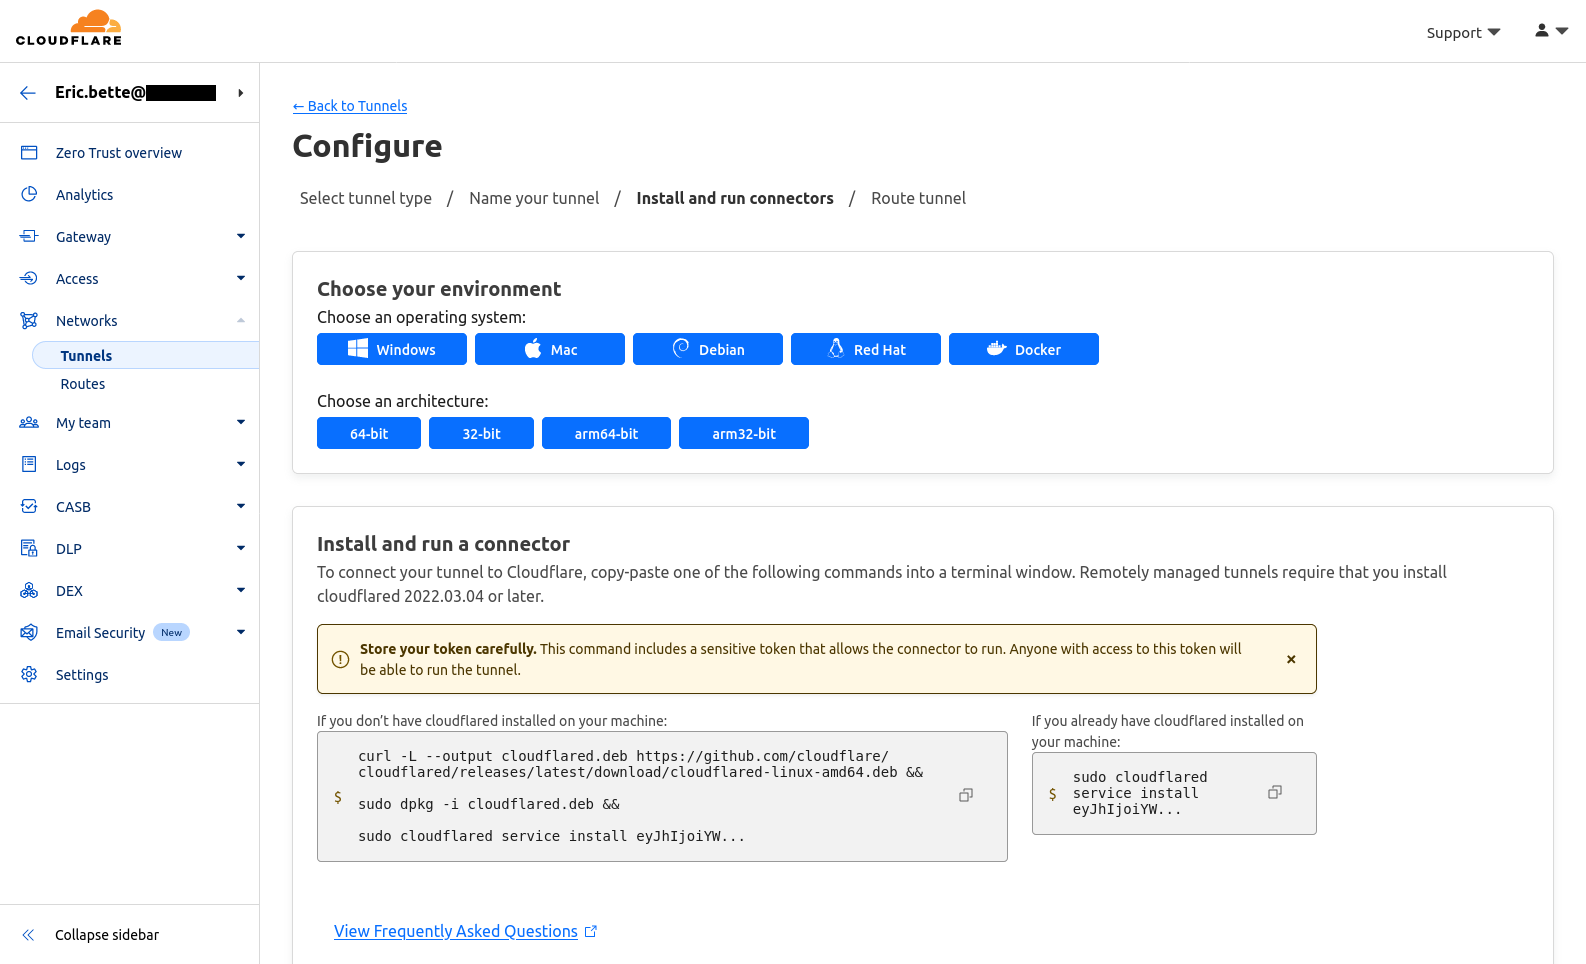
- Be at a screen like this:
Connecting the Server
We will need to get the Token ID for our tunnel, and then connect the server to Cloudflared Tunnel service using that Token ID.
Get a Token ID
First, we'll get a Token ID from the Cloudflared Tunnel Creation UI and set it up as a Docker environmental variable.
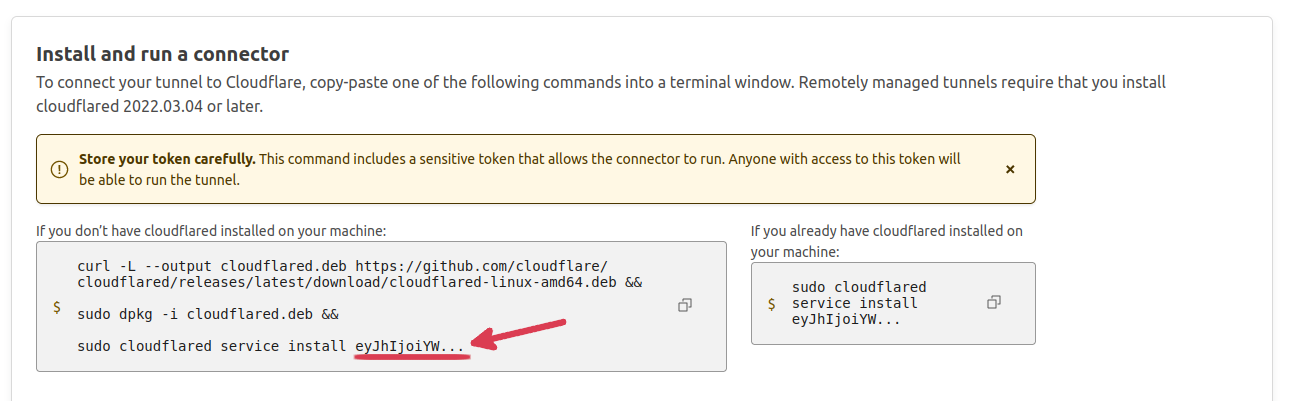
- At this screen, copy the tunnel token that is provided in the command under Install and run connector. This is the string of letters that is after the word
installin the provided command.
- Add
TUNNEL_TOKEN=yourTokenId(where yourTokenId is the token ID that you just copied) into an.envfile in the same directory wheredocker-compose.ymlexists and where you will be running yourdocker composecommands.
If this file doesn't exist yet (because you haven't passed any environmental variables to your Docker Compose environment), simply create it now.
eric@ubuntu-server:~$ cd
eric@ubuntu-server:~$ echo TUNNEL_TOKEN=yourTokenId >> .env
eric@ubuntu-server:~$ cat .env
TUNNEL_TOKEN=yourTokenId
Run the Tunnel Service
Now, we'll set up the Cloudflared Tunnel service to run using the TOKEN_ID variable we set up in the previous step.
- Add this to
docker-compose.yml(underservices)
services:
  cloudflared-tunnel:
    container_name: cloudflared-tunnel
    image: cloudflare/cloudflared:latest
    command: tunnel --no-autoupdate run
    environment:
      - TUNNEL_TOKEN=${TUNNEL_TOKEN}
    network_mode: host
    restart: unless-stopped
Note that the TUNNEL_TOKEN that we added to .env earlier is referenced here
- Run
docker compose up -d
This will pull and install the Cloudflared Tunnel container and connect your tunnel.
Congratulations! Your tunnel should now be set up and ready to add service endpoints.
- Optionally, verify the tunnel is up and running:
eric@ubuntu-server:~$ docker compose logs -f cloudflared-tunnel
cloudflared-tunnel | 2024-07-20T07:21:45Z INF Starting tunnel tunnelID=********-****-****-****-************
cloudflared-tunnel | 2024-07-20T07:21:45Z INF Version 2024.6.1
cloudflared-tunnel | 2024-07-20T07:21:45Z INF GOOS: linux, GOVersion: go1.22.2-devel-cf, GoArch: amd64
cloudflared-tunnel | 2024-07-20T07:21:45Z INF Settings: map[no-autoupdate:true]
cloudflared-tunnel | 2024-07-20T07:21:45Z INF Environmental variables map[TUNNEL_TOKEN:*****]
cloudflared-tunnel | 2024-07-20T07:21:45Z INF Generated Connector ID: ********-****-****-****-************
cloudflared-tunnel | 2024-07-20T07:21:45Z INF Initial protocol quic
cloudflared-tunnel | 2024-07-20T07:21:45Z INF ICMP proxy will use 192.168.1.144 as source for IPv4
cloudflared-tunnel | 2024-07-20T07:21:45Z INF ICMP proxy will use fe80::aaa1:59ff:febd:24a2 in zone enp0s31f6 as source for IPv6
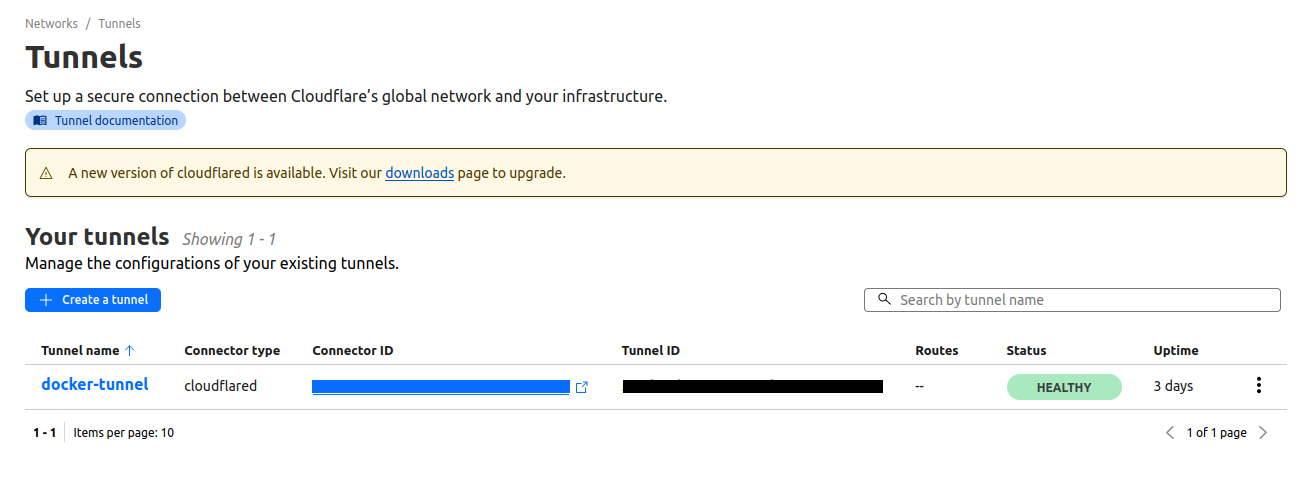
cloudflared-tunnel | 2024-07-20T07:21:45Z INF Starting metrics server on 127.0.0.1:36945/metricsYou should also be able to see it in HEALTHY state on the Cloudflare Zero Trust Dashboard:
Onboarding Services
As mentioned earlier, this is a tunnel that will be managed through the Cloudflare Zero Trust UI.
Prerequisites
Any service exposed on your host network.
⚠️ This means that any service running containerized, such as with Docker, will need its exposed ports to be forwarded to the network host.
For this guide, we'll assume that we have a Nextcloud service running on some arbitrary port 11000.
Connecting the Port
Here, we'll connect the tunnel to the exposed port on the server, making it accessible over the public internet.
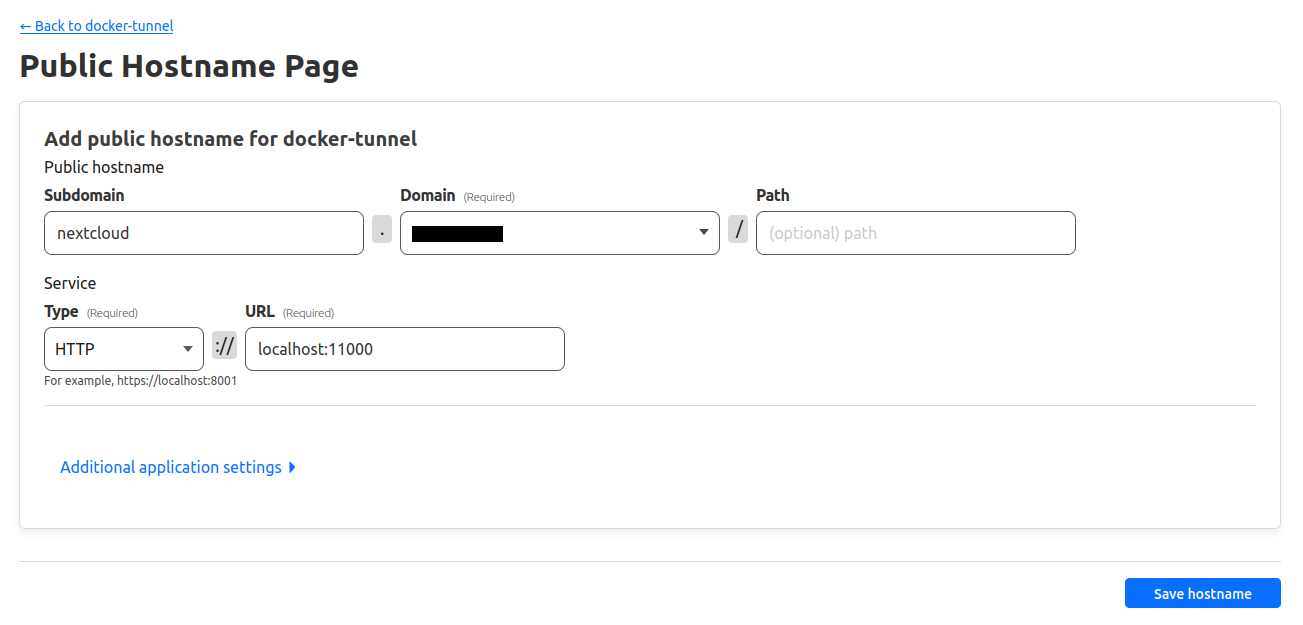
- Navigate to your tunnel configuration page: Home Dashboard > Zero Trust > Networks > Tunnels > yourTunnel > ... > Configure > Public Hostname
You should see a page like this:

- Click + Add a public hostname.
- Fill out the subdomain, domain, and path fields based on how you want to access your service. For example:
- For accessing the endpoint at nextcloud.mytld.com
- subdomain: nextcloud
- domain: yourtld.com
- path: <blank>
- For accessing the endpoint at mytld.com/nextcloud
- subdomain: <blank>
- domain: yourtld.com
- path: nextcloud
- For accessing the endpoint at mytld.com (this configuration can obviously only be used for one service)
- subdomain: <blank>
- domain: yourtld.com
- path: <blank>
- For accessing the endpoint at nextcloud.mytld.com
- Under Type, select HTTP
- Under URL, type localhost:<port>, where <port> is the port of your service exposed on the server's interface
I choose to use the first naming convention defined above, so my screen looks like this:
- Click Save hostname, and wait a few seconds for the new configuration to get pushed to your server. You can check the status of this using
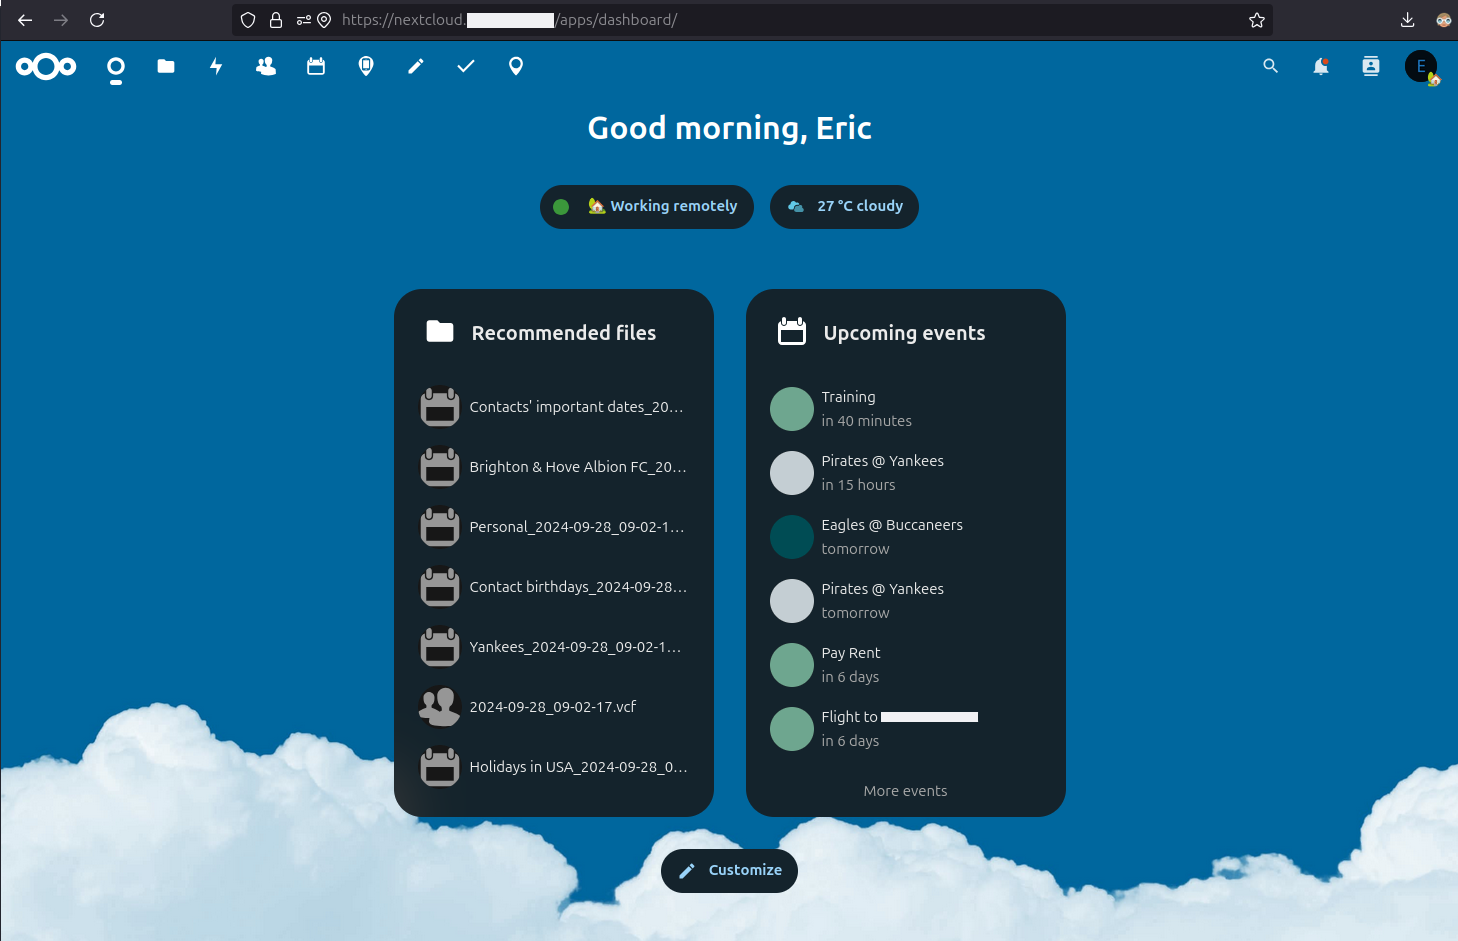
docker compose logs -f cloudflared-tunnel, but it really should only take a few seconds. - You are now able to access your server endpoint over the public internet:
That's it. You're done!
Conclusion
Cloudflared Tunnels are an easily deploy-able and configurable solution for setting up external access to a private server. Doing so through Docker Compose makes it easy to set up and replicate a reverse proxy engine without having to install any additional tools or applications..
Here, I showed how easy it is to set up a new tunnel using the Cloudflare Zero Trust Dashboard and Docker Compose.
I also showed how to set up a specific endpoint on your host for external access to that service over the public internet using the newly set up Cloudflared Tunnel.
As always, please leave any comments, questions, or criticism below. Thanks for reading!