One struggle that self-hosted server owners will inevitably come across is how to manage backups in a semi-automated and easily maintainable way.
The guide will show you how to use Cronicle and restic to create automated backups of the data on your self-hosted server in a remote location using Rclone.
The stack
As mentioned above, we'll be using the following 3 software to set up and manage our backup pipeline:
- Cronicle - for task scheduling and execution. Cronicle is a great alternative to native crontab for scheduling tasks. It is simple to set up and use but has great extensibility.
- restic - for executing backups and managing backup the backup repositories. restic is fast, easy-to-use, and feature-rich
- Rclone - for connecting restic to an external data store. Rclone is great for mounting external data stores, such as BackBlaze B2 storage or Nextcloud, to your local machine
Initial setup
First things first, we need to set up Cronicle on our host, and install and set up the software we'll use for connecting the remote repository (Rclone) and managing the backups (restic).
Step 1: Set up Cronicle
Simply follow the instruction in the Cronicle repo to set it up on your local machine: https://github.com/jhuckaby/Cronicle/blob/master/docs/Setup.md
Alternatively, for a Docker-based installation, follow my other guide on setting up and configuring Cronicle through Docker.
Step 2: Connect Rclone to your storage location and initialize the restic repo
This process may seem a bit daunting for users that are starting this process from scratch. I've covered the specific steps you can take for either a local install or a Docker-based installation in my previous guide, Configuring a Remote Backup Solution Using restic and Rclone.
Just follow the steps there and return here once you've got the remote repo initialized.
Setting up the pipeline
On to the next! All that's left to do is to actually run our backups and set up some maintenance tasks.
My high-level workflow is this:
- (Optional) Check to make sure the repo is unlocked
- Run my backups
- Run retention on the backups
- (Optional) Do a data integrity check on a random sample of data shards
One of the nice things about Cronicle is the ability to chain jobs upon completion of a preceding job. We'll utilize this functionality here to run this pipeline as 4 separate Cronicle jobs.
I also have email notifications set up on my Cronicle instance, so a failure at any point in the pipeline will notify me of the specific step in the pipeline that failed.
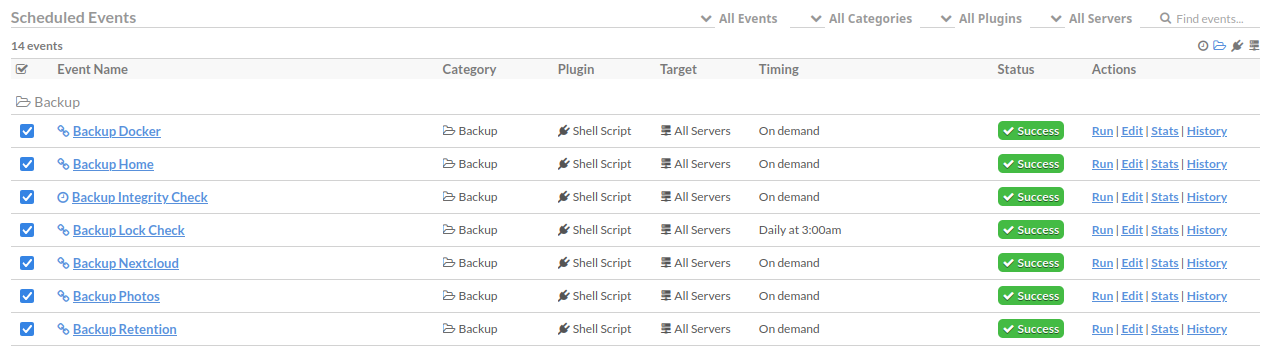
Here's all of my jobs organized in Cronicle:
Step 1: Lock Check
This step simply checks if there are currently any locks on the repository before running any backups on this. In theory, this step is unnecessary, since the backups would fail anyway if there are any locks on the repo.
However, since I get notifications based on the failed job, and all of the backup steps are separate jobs on my Cronicle instance, I prefer to separate my lock-related failures and my backup-related failures. Said differently, if I get notified of a failure at the (next) backup step, I know that it's not related to there being a lock on the repository, and is more likely something worth looking into.
This is the plugin code used to run the lock check:
#!/bin/sh

restic -r rclone:example-remote:example-repo snapshots -v
If using the Docker commands, it will look like this:
#!/bin/sh

docker run --pull always --rm --network host --env-file /home/eric/.env \
-v /etc/docker/restic/scripts:/restic-scripts \
-v /etc/docker/restic/cache:/root/.cache/restic \
-v /etc/docker/rclone/config:/root/.config/rclone \
tofran/restic-rclone:latest \
-r rclone:example-remote:example-repo \
snapshots -v
Note that if you're also using a Docker-based instance of Cronicle, you'll have to ssh into your local instance as described in Step 5: Set up a job to run on the host shell using SSH
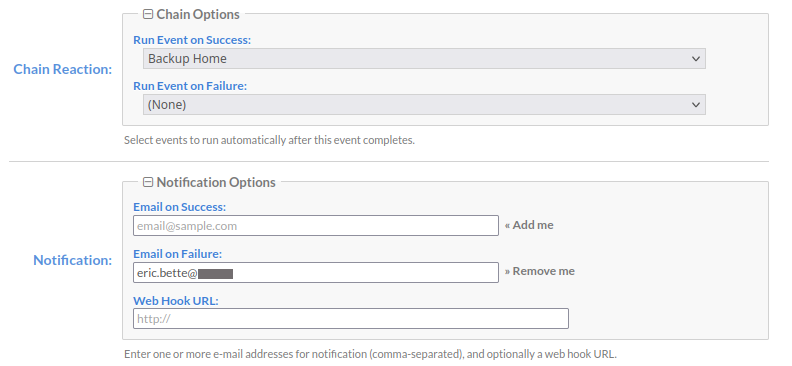
Chain this to the Backup command that you'll configure in the next step, and set up notifications if you want:
Step 2: Backup directories
I recommend setting up separate jobs for each directory you'd like to back up. In my case, I have the following:
/home/eric: My $HOME directory, which contains my.envfile,.ssh/directory, anddocker-compose.yml/etc/docker/: Contains all Docker config and important volumes which are mounted in my Docker containers. Since all of the services run on my server are managed throughdocker-compose.yml, this directory is imperative in case my server needs to be replaced- Nextcloud directory: all of the files which are contained on my self-hosted remote storage
- Photos directory: all of my pictures that are remastered/curated by PhotoPrism (article coming soon)
Here's the plugin script that is used to backup my home directory:
#!/bin/sh

restic -r rclone:example-remote:example-repo \
backup -v /home/eric
If doing this through Docker, I recommend mounting the target backup directory into a specific sub-directory in the Docker container (in my base, /backup-targets) to ensure that it doesn't clash with an existing sub-directory in the container.
#!/bin/sh

docker run --rm --network host --env-file /home/eric/.env \
-v /etc/docker/restic/scripts:/restic-scripts \
-v /etc/docker/restic/cache:/root/.cache/restic \
-v /etc/docker/rclone/config:/root/.config/rclone \
-v /home/eric:/backup-targets/home/eric \
tofran/restic-rclone:latest \
-r rclone:example-remote:example-repo \
backup -v /backup-targets/home/eric
Do this for as many directories as you'd like to backup, setting up execution chains and notifications as desired.
Step 3: Run retention on your repository
By default, restic keeps all versions of your backups. That is to say, if you run a backup 2 times, it will maintain both versions. restic is great about managing versions in such a way as to not store redundant files (more info in the docs), but it's still a good idea to clean up your repositories and only maintain a sensible history of your backups.
In my case, I keep the last 3 snapshots for each backup directory. It's easy to do this across all backups in a repository with a single command.
#!/bin/sh

restic rclone:example-remote:example-repo \
forget -v --keep-last 3 --prune
For Docker:
#!/bin/sh

docker run --rm --network host --env-file /home/eric/.env \
-v /etc/docker/restic/scripts:/restic-scripts \
-v /etc/docker/restic/cache:/root/.cache/restic \
-v /etc/docker/rclone/config:/root/.config/rclone  \
tofran/restic-rclone:latest \
-r rclone:example-remote:example-repo \
forget -v --keep-last 3 --prune
The prune command will remove any data and reclaim disk space for forgotten backups.
Step 4: Run an integrity check on a sample of the data
This is really an optional step, but since these backups are generally running for (hopefully) a really long time without having to be restored, it's a good idea to regularly check the integrity of the data packs and make sure that everything looks as expected.
Luckily, restic has commands that will do this for us. This is the last step of my pipeline and runs after the previous retention step:
#!/bin/sh

restic rclone:example-remote:example-repo \
check -v --read-data-subset 10%
For Docker:
!/bin/sh

docker run --rm --network host --env-file /home/eric/.env \
-v /etc/docker/restic/scripts:/restic-scripts \
-v /etc/docker/restic/cache:/root/.cache/restic \
-v /etc/docker/rclone/config:/root/.config/rclone \
tofran/restic-rclone:latest \
-r rclone:example-remote:example-repo \
check -v --read-data-subset 10%
Note that I use 10% as the --read-data-subset command because that seems like a sensible number to me, but you can choose whatever works for you. I run the command across a repo that is ~100gb and it takes around 45 minutes to complete.
You can find more info on checking your data integrity in the official documentation.
Conclusion
In this guide, we showed how to automate a backup pipeline using Cronicle to backup data stored on a self-hosted server, run maintenance tasks, and periodically check the repository's integrity.
If you have any tips or other thoughts regarding this process, let me know below!