
One of the biggest downsides (by far) with self-hosting content on a server is redundancy, or having multiple copies of your data located on multiple machines (preferably in separate physical locations).
The guide will show you how to configure restic and Rclone with an external data store to create backups of the data on your self-hosted server in a remote location.
The stack
As mentioned above, we'll be using the following 2 software to set up our backup infrastructure:
- restic - for executing backups and managing backup the backup repositories. restic is fast, easy-to-use, and feature-rich
- Rclone - for connecting restic to an external data store. Rclone is great for mounting external data stores, such as BackBlaze B2 storage or NextCloud, to your local machine
Initial setup
First things first, we need to set up Cronicle on our host, and install and set up the software we'll use for connecting the remote repository (Rclone) and managing the backups (restic).
Step 1: Connect Rclone to your storage location
Step 1.1: Install Rclone on the server (the machine which will be backed up)
For a local, native installation:
eric@ubuntu-server:~$ sudo -v ; curl https://rclone.org/install.sh | sudo bashFor a Docker-based job run, no installation is necessary (the container will be downloaded as part of the execution command).
However, you'll need to prepare a few local directories to store the Rclone and restic config and a few other files:
eric@ubuntu-server:~$ mkdir /etc/docker/restic/cacheeric@ubuntu-server:~$ mkdir /etc/docker/rclone/config
Step 1.2: Configure your remote
For a local, native installation:
eric@ubuntu-server:~$ rclone configFor a Docker-based job run:
eric@ubuntu-server:~$ docker run \
--rm --network host \
-v /etc/docker/restic/cache:/root/.cache/restic \
-v /etc/docker/rclone/config:/root/.config/rclone \
--entrypoint rclone \
tofran/restic-rclone:latest config
Thanks to the super handy restic-rclone container made by tofran, we can use both restic and Rclone through one container
Regardless of your installation choice, you'll be prompted to go through a workflow to connect your remote data store. Enter n to create a new remote, name it, and then follow the guide to make the connection.
The great thing about using Rclone with restic is that it doesn't matter which endpoint you use (B2, OneDrive, NextCloud, etc). They should all integrate similarly well with restic for your backups.
eric@ubuntu-server:~$ rclone config

No remotes found, make a new one?
n) New remote
s) Set configuration password
q) Quit config
n/s/q> q

e/n/d/r/c/s/q> n

Enter name for new remote.
name> example-remote

Option Storage.
Type of storage to configure.
Choose a number from below, or type in your own value.

 1 / ...
For in-depth documentation on each storage option available in rclone, check the official documentation.
Step 1.3: Confirm your remote
Assuming everything went smoothly, you should be able to confirm your remote got set up correctly by listing out your remotes using rclone:
eric@ubuntu-server:~$ rclone listremotesor for Docker:
eric@ubuntu-server:~$ docker run \
--rm --network host \
-v /etc/docker/restic/cache:/root/.cache/restic \
-v /etc/docker/rclone/config:/root/.config/rclone \
--entrypoint rclone \
tofran/restic-rclone:latest listremotes
Once that's been confirmed, we can move on to setting up the backup repository. Output:
example-remote:Step 2: Setting up a backup repository with restic
The next step is to initialize a repository using restic. To do this, we'll first need to set up a password for the repo.
Step 2.1: Set up a repository password
A remote restic repository requires a password by default. This password will need to be provided either by a static text file (less secure) or by a script (more secure depending on the implementation). There are a few ways to do this (covered in detail in the official documentation), and you can change how it's done even after the repository is initialized.
Option 1: Store the password in a file
This literally means hard-coding your password in a file, then passing that file as an argument to your restic commands using the --password-file argument or the RESTIC_PASSWORD_FILE environmental variable.
Example:
eric@ubuntu-server:~$ echo my_password > /etc/restic/password.txtOption 2: Store the password directly in an environmental variable
You can also store your password in an environmental variable RESTIC_PASSWORD that will be pulled by restic when running any commands against the repository.
Example:
eric@ubuntu-server:~$ echo export RESTIC_PASSWORD=my_password >> ~/.bashrceric@ubuntu-server:~$ source ~/.bashrcOption 3: Write a script to generate your password (presumably from a more secure database)
This is by far the most secure and best option, but also the most difficult to set up. There are virtually unlimited options for doing this, since in reality all that we're doing is writing a script to generate the password, and how the password is generated is up to you.
The first step here is to write the script to get the password. In my case, I am storing my password as an entry in Bitwarden, launching a local REST API on my server (article on this coming soon), and querying the password using the script:
eric@ubuntu-server:~$ cat /etc/docker/restic/scripts/get_restic_password.sh
#!/bin/bash

wget -q -O- http://0.0.0.0:8087/unlock --header "Content-Type: application/json" --post-data '{"password": '\"${BW_PASSWORD}\"} &>/dev/null

wget -q -O- http://0.0.0.0:8087/object/item/$BW_RCLONE_ID | grep -Eo '"password":"([^"]*?)"' | awk -F: '{print $2}' | tr -d \"

wget -q -O- http://0.0.0.0:8087/lock --header "Content-Type: application/json" --post-data '{"password": '\"${BW_PASSWORD}\"} &>/dev/null
I have the Bitwarden entry entered as an environmental variable BW_RCLONE_ID and my Bitwarden password entered as an environmental variable BW_PASSWORD
From here, you just need set an environmental variable RESTIC_PASSWORD_COMMAND as the path to your script:
eric@ubuntu-server:~$ echo export RESTIC_PASSWORD_COMMAND=sh /etc/docker/restic/scripts/get_restic_password.sh >> ~/.bashrcNote the sh before the path to the file
eric@ubuntu-server:~$ source ~/.bashrcA note on Docker usage
If you're doing the Docker deployment, you'll want to make sure that the environmental variables are set in a .env file, and that you're passing this file through the --env-file argument in your docker run commands.
Also, if referencing any local file, make sure that the file's directory is mounted as a volume when running docker run and that the environment variable matches the path in the Docker container (as opposed to the local path).
Example:
eric@ubuntu-server:~$ docker run
--env-file /home/eric/.env \
--rm --network host \
-v /etc/docker/restic/scripts:/restic-scripts \
-v /etc/docker/restic/cache:/root/.cache/restic \
-v /etc/docker/rclone/config:/root/.config/rclone \
tofran/restic-rclone:latest \
<command>
Note the addition of the --env-file arg in the command above
eric@ubuntu-server:~$ cat ./.env
...
RESTIC_PASSWORD_COMMAND=sh /restic-scripts/get_restic_password.sh
...
Note that the command points to the directory as mounted in Docker (not the local directory)
Step 2.2: Initializing the repo
Once you've set up a password, restic makes setting up a new repository very simple: just run the following command with your remote as the destination for the repo and restic will take care of the rest.
Assuming that your password/script are set up as environmental variables, no additional arguments need to be passed to restic:
eric@ubuntu-server:~$ restic -r rclone:example-remote:example-repo initFor Docker:
eric@ubuntu-server:~$ docker run \
--env-file /home/eric/.env \
--rm --network host \
-v /etc/docker/restic/scripts:/restic-scripts \
-v /etc/docker/restic/cache:/root/.cache/restic \
-v /etc/docker/rclone/config:/root/.config/rclone \
tofran/restic-rclone:latest \
-r rclone:example-remote:example-repo init
Note that we've removed the custom rclone entrypoint here, since from now on we'll be calling the restic CLI, which is the default entrypoint for this Docker container
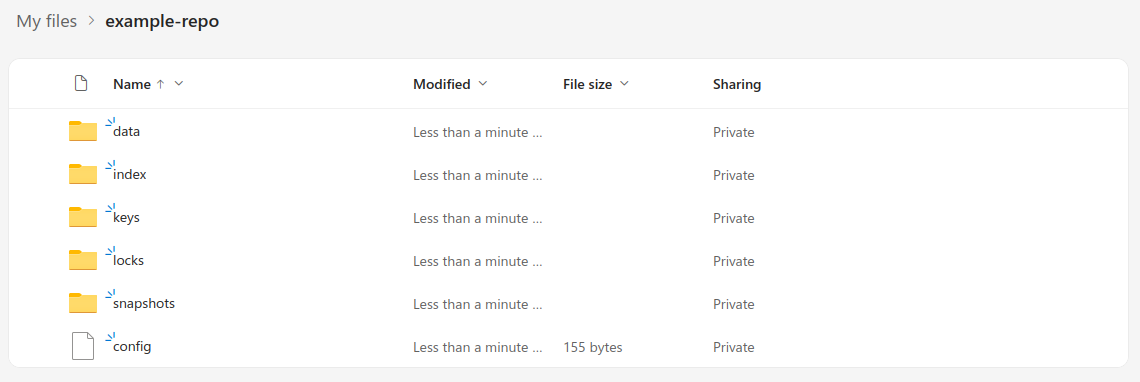
From this point, you should be able to check your remote data store and see the initialized repo:
Step 2.3: Run the backups
There you have it! Now, your repo is set up in the remote storage target and the server is prepared to start backing up data.
Backup strategies will depend on the individual user, so check the official documentation to determine the commands that you'll use for backing up your data.
Other helpful commands
Here are some other useful commands that can come in handy while managing snapshots.
List your backup snapshots
Sometimes it can be helpful to see a summary of all of the data in the repo:
eric@ubuntu-server:~$ restic -r rclone:example-remote:example-repo snapshotsDocker:
eric@ubuntu-server:~$ docker run --rm --network host --env-file /home/eric/.env \
-v /etc/docker/restic/scripts:/restic-scripts \
-v /etc/docker/restic/cache:/root/.cache/restic \
-v /etc/docker/rclone/config:/root/.config/rclone \
tofran/restic-rclone:latest \
-r rclone:example-remote:example-repo \
snapshots
Output:
ID        Time                 Host        Tags        Paths                                           Size
------------------------------------------------------------------------------------------------------------------
757a7db7  2025-04-11 03:00:16  example-repo                /backup-targets/home/eric                       23.980 MiB
1d5372d8  2025-04-11 03:00:32  example-repo                /backup-targets/etc/docker                      19.481 GiB
2a555964  2025-04-11 03:01:37  example-repo                /backup-targets/media/md0/media/content/Photos  45.455 GiB
efb68ffa  2025-04-11 03:01:58  example-repo                /backup-targets/media/md0/nextcloud             102.479 GiB
5d5777b4  2025-04-12 03:00:26  example-repo                /backup-targets/home/eric                       23.980 MiB
50bb4162  2025-04-12 03:00:43  example-repo                /backup-targets/etc/docker                      19.880 GiB
658bb12f  2025-04-12 03:01:55  example-repo                /backup-targets/media/md0/media/content/Photos  45.464 GiB
bf58ed5a  2025-04-12 03:02:16  example-repo                /backup-targets/media/md0/nextcloud             102.491 GiB
c6206a8a  2025-04-13 03:00:23  example-repo                /backup-targets/home/eric                       23.979 MiB
1e2fb0d1  2025-04-13 03:00:39  example-repo                /backup-targets/etc/docker                      19.969 GiB
3577f078  2025-04-13 03:01:33  example-repo                /backup-targets/media/md0/media/content/Photos  45.464 GiB
c8430b64  2025-04-13 03:01:48  example-repo                /backup-targets/media/md0/nextcloud             102.498 GiB
------------------------------------------------------------------------------------------------------------------
12 snapshots
Restore from backup
I recommend doing this at least once just to make sure that you can do it in case of an emergency.
This will restore the backup for the /etc/docker directory which we configured earlier.
eric@ubuntu-server:~$ restic -r rclone:example-remote:example-repo restore latest --target /etc/docker --path "/etc/docker"Note that if your machine got totally wiped, you'll need to set up/install restic and rclone again. Make sure to keep your password!
Docker:
eric@ubuntu-server:~$ docker run --rm --network host --env-file /home/eric/.env \
-v /etc/docker/restic/scripts:/restic-scripts \
-v /etc/docker/restic/cache:/root/.cache/restic \
-v /etc/docker/rclone/config:/root/.config/rclone \
-v /etc/docker:/backup-targets/etc/docker \
tofran/restic-rclone:latest \
-r rclone:example-remote:example-repo \
restore latest --target /backup-targets/etc/docker --path "/backup-targets/etc/docker"
Note that the --target and --path variables are set to the directory in the Docker container
Conclusion
In this guide, we covered how to set up restic and Rclone to create a remote backup repository for files on a self-hosted server.
If you have any tips or other thoughts regarding this process, let me know below!